
Gluten free + love bread? This real deal gluten free bread recipe is for you. Soft, chewy texture with the perfect crust.
Not all gluten free breads are created equally.
Take it from me. I’ve tried so many, and most don’t pass the test. Life is too short for dry, gummy, or tasteless bread.
Gluten free bread baking is an art. It requires a basic understanding of gluten free flours and how they combine to create the perfect texture. And how to use either a sourdough starter or active dry yeast to get the perfect rise. Today’s recipe is our family favorite every day gluten free bread made with yeast.
It’s perfect with breakfast eggs, almond butter, avocado, or with your favorite soup. It’s crusty on the outside with a chewy, soft texture on the inside. It looks + feels like regular bread.

Why we love everyday gluten free bread
❤️ the texture… is very similar to whole grain artisan bread you’d find at a good bakery. Unlike many gluten free breads, it’s not gummy or too dry + dense.
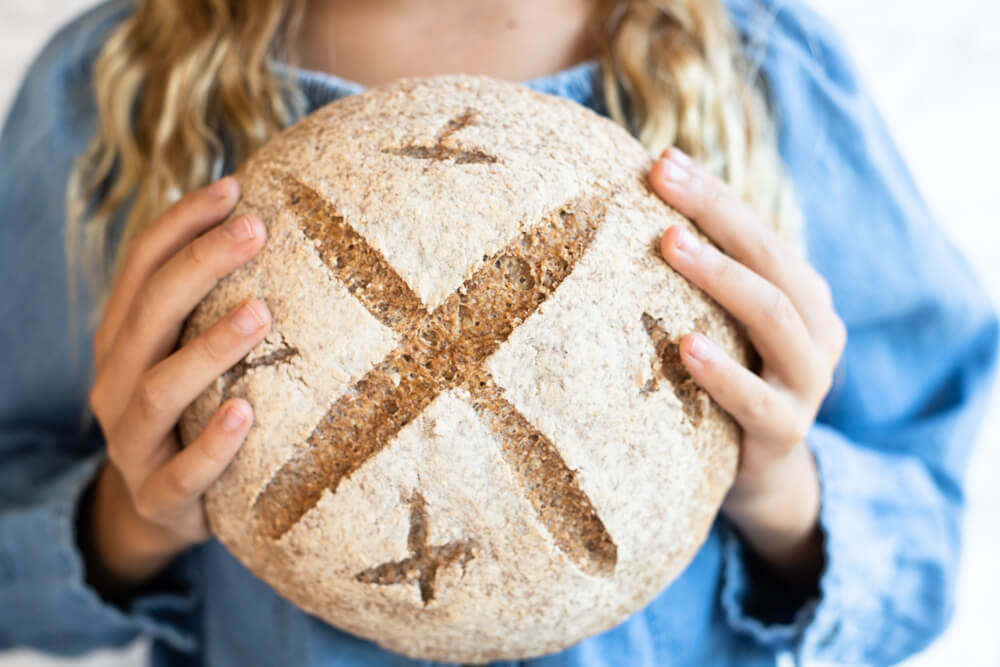
❤️ the crust… gives this bread a real rustic look and taste. Who doesn’t love a good artisan-style crusty bread.?
❤️ the flavor… again is similar to a whole grain loaf from a good bakery. It’s mild, yet complex. Definitely not a white bread kind of thing.
❤️ easy to make… trust me. If you’re a first-time bread-baker, you’ll never believe this bread came out of your own oven. And even if you’re a seasoned bread baker, you’ll love this recipe’s simplicity.

What flours do I need?
The best gluten free bread is made with a combo of flours to get just the right flavor and texture. After many (and I mean many!!) experiments, I’ve settled on my favorite combo of:
- sorghum flour
- buckwheat flour (I make my own from THIS)
- brown rice flour
- tapioca starch
A word about buckwheat flour
I have found that if I grind my own buckwheat flour from hulled buckwheat grouts, I get a much lighter and better tasting flour. It’s super simple to do. Just grind the groats in a food processor until you get a nice flour, about 2 minutes.
Store-bought buckwheat flour will have a darker appearance and will have a stronger flavor. If that’s what you have, it will still be absolutely delicious.
Can I make flour substitutions?
Each flour has it’s own flavor and structure. If you make substitutions, it will change things a bit every time. Feel free to experiment as much as you like. It’s how you learn what you like. When making substitutions, be sure to sub by weight not by volume measurement.
❤️ I really LOVE the sorghum and buckwheat combination so I highly recommend that you stick with those.
❤️ If you do not have brown rice flour, you can use millet flour or oat flour instead.
❤️ If you do not have tapioca starch, you can use potato starch or arrowroot powder instead.
What else do I need to make gluten free bread?
❤️ active dry yeast… gives bread the airy, light texture we all love plus a bit of a “nutty” flavor. Dormant yeast cells in active dry yeast need to be proofed before baking by dissolving the yeast in warm water (about 105-110°F) and then allowing it to bloom. Adding a bit of honey or sugar helps feed the yeast. A thin layer of fuzzy bubbles should form at the top of the liquid after about 10 minutes, and this is how you know that the yeast is still alive. If it doesn’t bloom, your yeast has probably expired.
❤️ 1 tbsp honey... to feed the yeast. You can use 1 tablespoon sugar instead if you want to keep the bread 100% vegan.
❤️ psyllium husk… acts sort of like a gluten substitute and gives the dough elasticity and flexibility. Use ground whole husk not the fine powder. Do not leave out the crucial ingredient.
❤️ salt… because salt is life and is the best flavor enhancer.
❤️ olive oil… just a titch. I love the flavor it gives and it adds a bit of moisture. You can leave it out if you prefer.

Do I really need to weigh my ingredients?
While I’ve included volume measurements (cups and tbsps), I HIGHLY recommend weighing your main flours and water with a kitchen scale. It’s the best way to ensure reliable, accurate, and precise results in bread baking. If at all possible, measure in gram measurements.
In my experience, measuring by volume (in cups) has given inconsistent results.
Do I need a Dutch oven to bake bread?
While not totally necessary, I’m a big fan of baking bread in a Dutch oven with a heavy lid. I love the way a Dutch oven produces a high and steady heat. The heavy lid keeps the moisture inside during the first 20 minutes of the bake, allowing the bread to spring up (oven spring) or rise further while cooking.
If you do not have a Dutch oven, no worries? You can make beautiful bread in a large cast iron skillet with another skillet (or baking pan) underneath with water to create the steam needed. Do not use glass as it can shatter at high temperatures.
Storing gluten free bread
This gluten free loaf can be stored on the kitchen counter, wrapped in a towel, for a couple of days. Our family prefers to slice and freeze it because we don’t eat bread every day and it’s super easy to pop into the toaster when we want it.
As with most breads, especially gluten free breads, my personal opinion is that it tastes better toasted. We do LOVE to eat fresh slices covered in ghee the day that we bake it, but after that, toasted is the way to go.
How to make every day gluten free bread Step by Step

- Whisk together warm water, active dry, yeast + honey. Let sit for 10 minutes until foamy + bubbly.

2. Combine flours + salt in a separate large bowl.

3. Once yeast is activated, whisk in psyllium husk and wait one minute.

4. Add wet yeast/psyllium husk water to dry flours and mix with wooden spoon.

5. Then knead by hand until dough is smooth and elastic and pulls off the sides of the bowl nicely. Dust lightly with flour if too sticky.

6. Cover with towel and place in a warm spot for one hour, until it doubles in size.

7. After an hour, the dough will have almost doubled in size. Punch it down and knead again on a lightly floured surface, shaping it into a smooth ball. Transfer dough ball to a tea towel-lined soup bowl dusted with flour (about 6 inches in diameter), fold towel over and place in a warm place for another hour.
Thirty minutes into the second dough rise, preheat oven to 450’F. Place large Dutch oven with lid into oven to preheat. (*see note in recipe card if you do not have a Dutch oven)

8. Once dough has risen for an hour, turn it out onto a piece of parchment paper. Dust the top with sorghum flour, wiping off excess with your hand.

9. Use a sharp knife or razor to score the top of your loaf. For some bread scoring inspiration, you can go HERE.

10. Carefully remove preheated Dutch oven from hot oven. Lift loaf with the edges of the parchment paper and place into Dutch oven. Cover and bake for 20 minutes. Remove lid and then bake for another 30-35 minutes, until bottom is brown and loaf sounds hard and hollow when tapped with a wooden spoon.

11. Cool before slicing. Cooling allows the crumb to set.

Love to bake?
Be sure to check out my Simple Gluten Free Sourdough Bread recipe.
DID YOU MAKE THIS AND LOVE IT? I WANT TO SEE YOUR CREATIONS. SHARE THE LOVE ON INSTAGRAM AND TAG @savorylotus AND USE THE HASHTAG #savorylotus FOR A CHANCE TO BE FEATURED. FOLLOW SAVORY LOTUS ON PINTEREST AND FACEBOOK TO KEEP UP WITH LATEST CONTENT AND UPDATES.
Print
Everyday Gluten Free Bread
- Prep Time: 2 hours, 15 minutes
- Cook Time: 50 minutes
- Total Time: 3 hours 5 minutes
- Yield: one loaf 1x
Description
Real deal gluten free bread recipe. So easy to make. Soft, chewy texture with the perfect crust. Dairy + egg free.
Ingredients
- 400 grams (about 1 and 3/4 cups) warm water (105-110’F)
- 9 grams (1 tbsp) active dry yeast (like this)
- 1 tbsp honey (or sugar to keep it vegan)
- 20 grams psyllium husk (1/4 cup) (like this)
- 110 grams (1 cup) sorghum flour (like this)
- 130 grams (1 cup) buckwheat flour
- 50 grams (1/3 cup + 2 tbsp) brown rice flour (like this)
- 100 grams (1 cup) tapioca starch (like this)
- 2 tsp salt
- 1 tbsp olive oil
Instructions
- In a small bowl, whisk together warm water, yeast, and honey. Set aside in a warm place for 10 minutes, until the surface is foamy and slightly bubbly.
- In another large bowl, whisk together sorghum, buckwheat, tapioca, brown rice flour, + salt. Set aside.
- Once yeast water is foamy, whisk in psyllium husk and wait about 1 minute. Then pour wet mixture into dry flour mixture along with olive oil and stir with a wooden spoon until it comes together then knead by hand until dough is smooth and elastic and pulls off the sides of the bowl nicely. Dust with a bit of extra sorghum flour if it feels too sticky. Form into a ball, cover with clean kitchen towel, and set aside in a warm place for one hour.
- After an hour, the dough will have almost doubled in size. Punch it down and knead again on a lightly floured surface, shaping it into a smooth ball. Transfer dough ball to a tea towel-lined soup bowl dusted with flour (about 6 inches in diameter), fold towel over and place in a warm place for another hour. Dough will noticeably increase in size.
- Thirty minutes into the second dough rise, preheat oven to 450’F. Place large Dutch oven with lid into oven to preheat. (*see note if you do not have a Dutch oven)
- Once dough has risen for an hour, turn it out onto a piece of parchment paper. Dust the top with sorghum flour, wiping off excess with your hand. Use a sharp knife or razor to score the top of your loaf.
- Carefully remove preheated Dutch oven from hot oven. Lift loaf with the edges of the parchment paper and place into Dutch oven. Cover and bake for 20 minutes. Remove lid and then bake for another 30-35 minutes, until bottom is brown and loaf sounds hard and hollow when tapped with a wooden spoon.
- Cool on a rack for 4 hours or overnight before slicing. Cooling sets the crumb. Slicing bread before it is cool can affect the texture. It’s worth the wait, I promise.
Notes
I HIGHLY recommend weighing your ingredients in order to get the proportions just right. My experience with trying to measure water and flour with measuring cups has been inconsistent. Measuring by weight (in grams) gives the best results in bread baking.
I have found that if I grind my own buckwheat flour from hulled buckwheat grouts, I get a much lighter and better tasting flour. It’s super simple to do. Just grind the groats in a food processor until you get a nice flour, about 2 minutes. Store-bought buckwheat flour will have a darker appearance and will have a stronger flavor. If that’s what you have, it will still be absolutely delicious.
I prefer to bake bread in a Dutch oven with a heavy lid. My bread always turns out better. If you do not have a Dutch oven, you can bake bread in a large cast iron skillet, adding another smaller cast iron skillet or baking sheet (do not use glass) on the bottom shelf for water to create a bit of steam. When preheating oven to 450’F, place large skillet and smaller skillet (or baking sheet) into oven. Once ready to bake, remove skillet from oven, lift parchment paper and loaf onto skillet and place back into oven. Remove smaller skillet (or baking pan) from oven and quickly add 8-10 ice cubes to it. Place back under bread loaf. Close oven quickly. Bake for 20 minutes then remove lower skillet with water. Bake for another 25-35 minutes, until loaf of golden. Each skillet is different so you will have to experiment with the one you have.
Click HERE to PIN THIS!

As an Amazon Associate I earn from qualifying purchases.

How can I swap out the flours listed for coconut and almond flours? Would they work for this bread?
Hi, Marita. I haven’t tried the recipe with either of those flours. It would drastically change the texture of the bread. Please let me know if you try it.
Can you please send recipe via email. I cannot print it from my phone.
done.
Your bread looks delicious! I’m planning try it. What size diameter (or amount of quarts) is your Dutch oven you use to bake this particular loaf?
I use my large 7 quart Dutch oven. But I’ve used much smaller ones too. It just needs room to rise a bit.
I made the recipe but instead of brown rice flour I substituted a gluten free blend so it could be grain free too. Looks and tastes great. Thanks for the recipe..
Thank you so much for your sub. I’m glad you enjoyed it. 🙂
I’ve never baked bread before. Thank you for making my first time so easy and fun. I love this bread. And so does my family.
Yay! Welcome to the world of baking.
Hi
Would this recipe work in a bread maker?
I have never tried it in a bread maker. Please report back if you try it. 🙂
Katja – I made this bread over the weekend. My yeast was pretty old and didn’t proof well, but I went ahead and completed the recipe anyway. I ended up with a loaf that was a little smaller in diameter than your picture, but OMG! the flavor is amazing. Sure it’s dense, but we love that and I’m headed out for fresh yeast and plan to make more today. Thank you for this amazing recipe!!!!
WooHoo! I love hearing that. Yes, important to use good yeast. Be sure that it is nice and foamy before you add it to the flour mix. Also, GF sourdough does not rise as much as traditional bread. 🙂
Would teff flour work as a sub for sorghum flour?
I have never tried that. But I find that bread recipes are pretty forgiving. You may have to adjust the water content. I’m not sure if teff is drier than sorghum. Please report back if you try it. 🙂
Hi,
I tried making this bread tonight but when I added the yeast, warm water, etc. and the oil to the flour, the dough wouldn’t come together. It looked like shredded dough. I added more water and oil to get it to hold a bit better and after it proofed for an hour and a half it came together more but there were cracks and it wasn’t as pliable and stretchy as I was expecting it to be. We are letting it proof tonight and will bake it on the morning. I’ll let you know how it goes but is there anything that could’ve affected the dough coming together? With other gluten free bread, I typically use a lot less water with the active yeast but I wanted to follow the recipe.
Hi! Without seeing your dough, it’s hard to know what has happened. Did you weigh out all of your ingredients? What type of buckwheat flour did you use? Did you grind your own? It sounds like there was too much flour. The 400 grams of water (about 1 + 3/4 cups) is a good amount for the amount of flour in the recipe. If the dough is too dry in this step, you can add more water 1 tbsp spoon at a time until it comes together. You can see in my step by step that when you add the yeast water and oil, the dough should come together really well. Hope that helps. 🙂
This is hands down the best gluten free bread I have tried. Thank you so much for this awesome recipe.
Yay! I’m so happy to hear this. 🙂
Hi Katja. I love this bread! The taste and texture are great, although mine didn’t rise very much and I’m wondering what type of yeast do you use? Also, how long do you need your dough for? Another question ~ why not use glass in the oven? I ended up borrowing a dutch oven from a neighbour this time, but I have a round glass baking dish with a lid I thought might work, so I’m curious about your comment to not use glass ~ even though it was about the dish of water when not using a Dutch oven, and not about the actual baking vessel.
I meant knead your dough~ LOL!
Hi, Darlene-
I use a bulk yeast that I get from my local health food store. This bread does not rise as much as regular gluten bread but if you’re not getting a good rise, your yeast may be old. I knead the dough until it is uniform and smooth. Some days it takes longer as I think my sourdough starter may be less liquidy and dough it drier. No hard and fast rule. It’s not like gluten that needs to kneaded longer. And about the glass, glass can shatter at very high temperatures so you son’t want to use it if cooking at 450’F. I’m so happy to hear that you are baking my bread. 🙂
Hi Katja. I finally have all my ingredients together but I don’t have a dutch oven nor cast iron pans. When referring to using a dutch oven you say “don not use glass” ~ do you mean the pan of water under or the baking vessel itself? Why not use glass? I have a round glass baking dish with a lid I considered using even though it’s quite a bit smaller than the size of your bread.
Glass can shatter at high temperatures so I don’t recommend baking in it when the oven is 450’F.
This was a success for me! I was a little nervous because I had to spend a lot to buy all the flours, but since it was good, it’s going to be economical in the long run. Thanks!
Yay! So happy to heat that. 🙂
I love all your gluten-free bread recipes. I have attempted several and my dough has never risen.
I’ve proofed the yeast and it foams up beautifully. After I mix everything together the dough does not rise.
I still bake it and it has a gooey dense texture. I don’t know what I am doing wrong.
I do live in a warm environment 78-80 F normally is the outside temp. And I also live at sea level. I am not sure if that has an effect on the dough.
Hi, Dee. Without seeing what’s happening, it’s hard to troubleshoot. This dough will not “rise” like a traditional dough. I should “puff up” a bit and be a bit spingy. It will not totally double in size. I wonder if your yeast is not fresh enough??? I’m not sure why it is not rising if your yeast is getting foamy. Are you grinding your own buckwheat flour? Store-bough tends to be more heavy and dense. This GF bread does tend to be more dense than a traditional white loaf. It should not be gooey. I wonder if you are not baking it long enough? Every oven is different.You could try baking it longer. Are you letting it cool completely before cutting into it. You could try omitting the olive oil. Some folks prefer it without. 🙂
It turned out great, the texture, crumb and everything! I’ll definitely be making this recipe again!
This was my first time baking bread, and I choose this recipe as it was more simple compared to other recipes.
I used the cast iron method, as I wasn’t comfortable putting a Dutch oven in a such high temp w the risk of the enamel cracking. The dough didn’t rise a lot the second time, and so the loaf was a little bit small. It also didn’t really brown on the top at all, it was pretty pale, while the bottom had a nice colour. I also used store bought buckwheat flour, as that’s what I had.
Thanks for sharing your experience. Dutch oven are made to go into oven with high heat, but the skillet method works just as well. Not sure why the loaf didn’t brown on the top. Every oven is different. But the Dutch oven method does produce a very nice crust. 🙂
Hi. Thank you so much for the recipe. We are trying it for the first time today.
One question, are you supposed to transfer the dough directly to the Dutch oven or are you supposed to lift the dough with the parchment and put that directly in contact with the oven?
The recipe makes it sound like the parchment paper should be the thing in direct contact with the Dutch oven and then the dough on top of that. Worried that the paper will burn. Thank again
Yes, I lift the dough on top of the parchment paper into the Dutch oven and it stays inside while the bread bakes.
Thank you for this wonderful sounding recipe! I’m heading out to shop for the flours
Q: I make a lovely (gluten) bread with lots of seeds in it. Would your recipe accommodate seeds? (poppy, sesame, pumpkin and sunflower are what I use). Also I replace honey w/ Molasses – will give that a try as I experiment.
Q: To what internal temp do you advise baking this loaf?
I will happily rate when I’ve tasted the outcome!
Yes, I add seeds to my bread all of the time. I haven’t tried it with molasses. And I don’t measure internal temperature so I cannot answer that. I’d love to hear how it goes.
What a great recipe thank you. It is the first time I have baked bread. Used it twice but did not have sorghum so substituted a mix of brown rice flour and chickpea and second time BRF & Hemp flour. Both times very successful Thank you.
QUESTION: I would like to an even more nutritious with less starch or zero starch. Is it possible to replace the tapioca starch with more psyllium? keen to know> Thanks.
I’m so glad you like the recipe. If you want to use less starch, you can sub it with some of the denser flours (not the psyllium.) YOu will have to play with ratios in order to get the texture that you like.
Hi
Is it possible to bake this in a bread maker?
Thanks
Hi, Patty. I don’t have a bread maker and have never used one. So I am not sure how they work.
This came out pretty well for me. Someone asked about the internal temperature to bake the bread to: When I looked up the internal temp for GF bread, the answer I got was 210 degrees, so that’s what I used, and it turned out well. I used storebought “dark” buckwheat flour, and it wasn’t bad, but it did have a very slightly bitter edge. I suspect the lighter buckwheat might be better. I want to try this again and play with the flours a little. The texture was pretty nice. This was my first time making GF bread, though not my first time making bread generally. When I mixed in my water it really didn’t look like enough liquid. I definitely had to knead it before all the liquid incorporated. (I wonder if that’s what happened to the person who said theirs looked like ” shredded dough”). Thanks for sharing this recipe. I’m really glad to have GF bread without xanthan gum.
Thanks for the feedback. Yes, store-bought buckwheat is a bit more dense. so you will have to add a bit more water. Baking bread for me is always an experiment to see what works and what I like. 🙂
Hi, looks great! Can you tell us what size Dutch oven?
Thanks!!
I have several big Dutch ovens for baking bread I think one is just over 5 quarts and the other is just over 7 quarts.
Will this recipe work with finely ground psyllium? If so, do I need to decrease the amount of the coarser psyllium called for in the recipe? Thanks!
I haven’t tried it with super finely ground psyllium so not sure how it will turn out.